|
 1
2
3
4
5
6
7
8
9

20) Select Density >> and Enter the Values as shown in Fig 2.9 below.

Fig - 2.9: (Density For First Phase i.e. water)
Click Apply when Finished.
Similarly Specify Density for Second Phase By Selecting Density again from Fluid Properties and Constants and enter the values as Shown in Fig 3.0 below.

Fig - 3.0: (Density For Second Phase i.e. Oil)
Click Apply when finished.
After applying this command you will see following dialog Box Fig
3.1 asking for ADD density as a new Command as we have already specified for First Phase.

Fig - 3.1: (Add or Replace Density Command)
Select Add as a new Command and Click Ok.
21) Now Specify Viscosity For First Phase by Selecting Viscosity Option from Fluid Properties and Constants and enter the values 2.32E-04 for First Phase and 3.22E-04 for Second Phase. as shown in Fig 3.2 and Fig 3.3 respectively.

Fig - 3.2: (Viscosity For First Phase)
Click Apply when Finished.
22) Similarly Specify Viscosity for Second Phase By Selecting Viscosity again from Fluid Properties and Constants and enter the values as Shown in Fig 3.3 below.

Fig - 3.3: Viscosity For Second Phase
Click Apply when finished.
After applying this command you will see following dialog Box Fig
3.4 asking for ADD Viscosity as a new Command as we have already specified for First Phase.

Fig - 3.4: Add or Replace Viscosity Command
Select Add as a new Command and Click Ok.
23) Add the following commands manually in the Command Window after the Viscosity Command as version 5.5 beta, the interface does not support the automatic generation of this command.
FLUId COMPressibility 5.40e-6 FIRSt
FLUID COMPressibility 1.87e-5 SECOnd.
This completes the Specification for Fluid Properties and Constants.
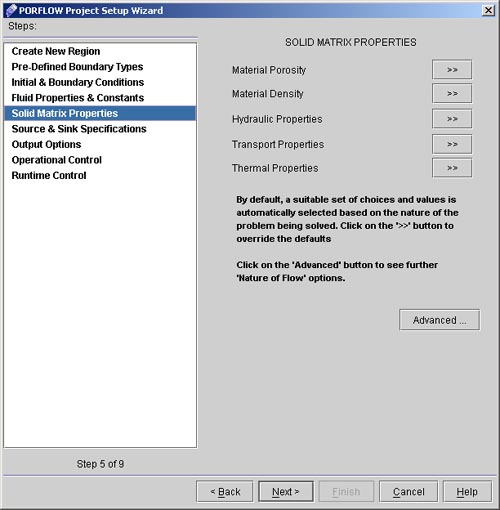
24) Next Select Solid Matrix Properties from "Porflow Project Setup Wizard" as shown in Fig 3.5 below.

Fig - 3.5: Solid Matrix Properties
25) Click on Material Density >> from Solid Matrix Properties and enter the Values as shown in Fig 3.6 below.

Fig - 3.6: Material Density
Enter Density as 2500 and value of 1 in From Thru and Skip respectively.
Click Apply when Finished.
26) After Material Density Specification Click on Porosity and Enter the Value of Porosity as 1 as shown in Fig 3.7 below.

Fig - 3.7: Material Porosity
Click Apply when finished.
After applying this Command Add or Replace Dialog will appear as seen in
case of Density and Viscosity. Select Add as a new Command and Click OK.
27) Next comes Hydraulic Properties. Click on Hydraulic from Solid Matrix Properties Options in Porflow Project Setup Wizard Dialog.
Enter the Values as shown in Fig 3.8 below.

Fig - 3.8: Hydraulic Properties
Specify Matrix Compressibility as 1.0E-10 and Conductivity as 1.00E-03 for Kx, Ky , Kx.
Click Apply when finished.
 1
2
3
4
5
6
7
8
9

# Back to CFDStudio/PORFLOW Tutorials Page
Related Links:
# PORFLOW Applications
# PORFLOW Express
# PORFLOW Publications
# PORFLOW Users
# PORFLOW Price List
# Request CFDStudio/PORFLOW Demo
# CFDStudio/PORFLOW Tutorials
# PORFLOW Manual
# PORFLOW Validation Report
|


