HOME
SOFTWARE
--- CFDStudio
--- ANSWER
Applications
Examples
ANSWER Express
Publications
Users
Price List
Request Demo
ANSWER Tutorials
ANSWER Manual
--- PORFLOW
--- TIDAL
--- RADM
--- TOOLS
DOWNLOADS
APPLICATIONS
CONSULTING
STORE
COMPANY
CONTACT
FAQ
 

ACRi -- Analytic & Computational Research, Inc.


1 2 3 4 5 6 7

19) Click "Inlets >>" button to specify the inlet region as follows

  1. Select the "Entire Boundary" as "INLET"
  2. Select the direction in which you define the boundary condition, which is X- for our case;
  3. Click "Apply";

20) Click "Outlets >>" button to specify the outlet region..

  1. Select the "Entire boundary"
  2. Select the direction in which you define the boundary condition, which is X+ for our case;
  3. Choose flow fraction 1.0;
  4. Click "Apply";

21) Click "Walls >>" button.

  1. Select the "Entire boundary"
  2. Select the direction in which you define the boundary condition, which is Y- for our case;
  3. Click "Apply";

22) Click "Walls >>" button, again:

  1. Select the "Entire boundary"
  2. Select the direction in which you define the boundary condition, which is Y+ for our case;
  3. Click "Apply";

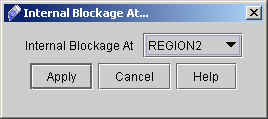
23) Click "Internal Blockage >>" button and select the Internal Blockage At "REGION2".

24) Click "Apply". (See fig 2.3)

Fig - 2.3: Dialog for select Internal Blockage

This concludes the BOUNDARY TYPES specification

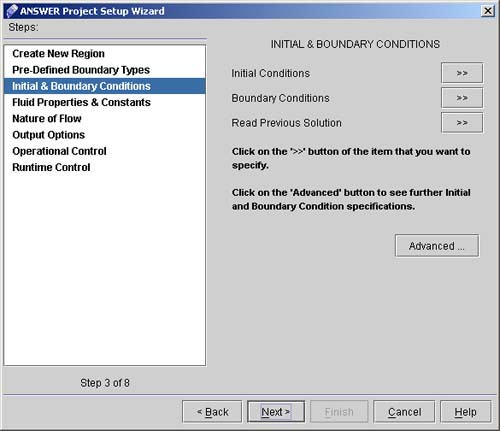
25) Click "Next >" to go to INITIAL & BOUNDARY CONDITIONS dialog window (See Fig. 2.4). We will specify the initial guesses for the dependent variables.

Fig. 2.4 Dialog Window for Initial & Boundary Conditions

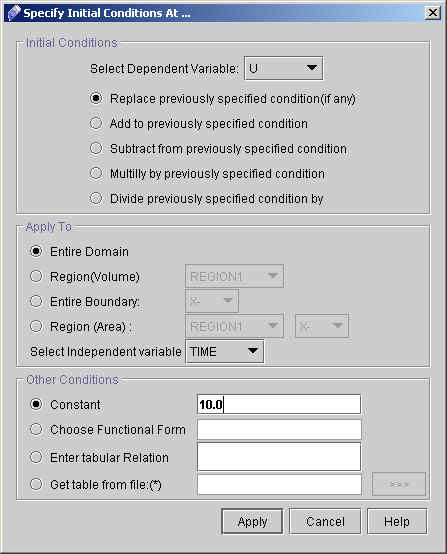
26) Click "Initial Conditions >>" button to specify the Initial conditions.

27) The corresponding dialog window looks like Fig.2.5. We will set the initial conditions for axial velocity U, vertical velocity V, pressure P, turbulence kinetic energy K, and length scale of turbulence L. (FIG 2.5)

Fig - 2.5: Initial Conditions screen.

28) Set U=10.0:

  1. Select U from the Select Dependent Variable list;
  2. Keep the Replace previously specified condition (if any) item checked as the type of initial condition;
  3. Keep the Apply to item at Entire Domain;
  4. Since we will be setting the condition as a constant, Select independent variable item is insignificant;
  5. Check Constant and enter the value 10.0;
  6. Click "Apply".

29) Set V=0.0: Change only the dependent variable to V and the constant value to 0.0, click "Apply".

30) Set P=0.0: Change only the dependent variable to P and the constant value to 0.0, click "Apply".

31) Set K=1.5: Change only the dependent variable to K and the constant value to 0.01, click "Apply".

32) Set L=0.14: Change only the dependent variable to E and the constant value to 0.111, click "Apply".

That concludes the setting of initial conditions.

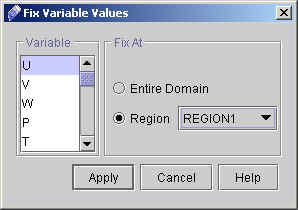
33) Click on "Advanced" option under Initial and Boundary Condition and choose the "Fix variable values". Select variable U and REGION1 as shown in fig. 2.6., Click "Apply".

Fig - 2.6: Screen to fix variable values

34) Repeat 'step 32' for variables P and V.


1 2 3 4 5 6 7


Back to CFDStudio/ANSWER Tutorials Page


Related Links:

ANSWER Applications
ANSWER Examples
ANSWER Express
ANSWER Publications
ANSWER Users
ANSWER Price List
Request CFDStudio/ANSWER Demo
CFDStudio/ANSWER Tutorials
ANSWER Manual


HOME | SOFTWARE | DOWNLOADS | APPLICATIONS | CONSULTING | STORE | COMPANY

© 2015 ACRi